Milestone 2: Prototyping
Saturday, June 25th, 2022

- Name
- Nguyen Vu Khang
- @nguyenvukhang

- Name
- Tan Wei Seng
- @weiseng18
Problem
Hard to visualize degree requirements
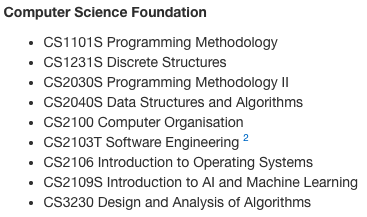
In NUS, degree requirements are presented in textual form. The required modules are usually presented in a bullet point list. It is not obvious when you can take these modules, and how they are related to each other.
Additionally, there are many ways to go about completing the same degree. You can choose to clear all your core modules first, or you can explore electives and specializations first.
Degree requirements aren’t exhaustive
In some degrees, in order to clear the pre-requisites to study some core modules, you even need to study modules outside of the core list. For example, in Computer Engineering, EE4204 Computer Networks is listed as a degree requirement. However, one of its pre-requisites, ST2334, is not listed in the core modules.
Module relations are complicated
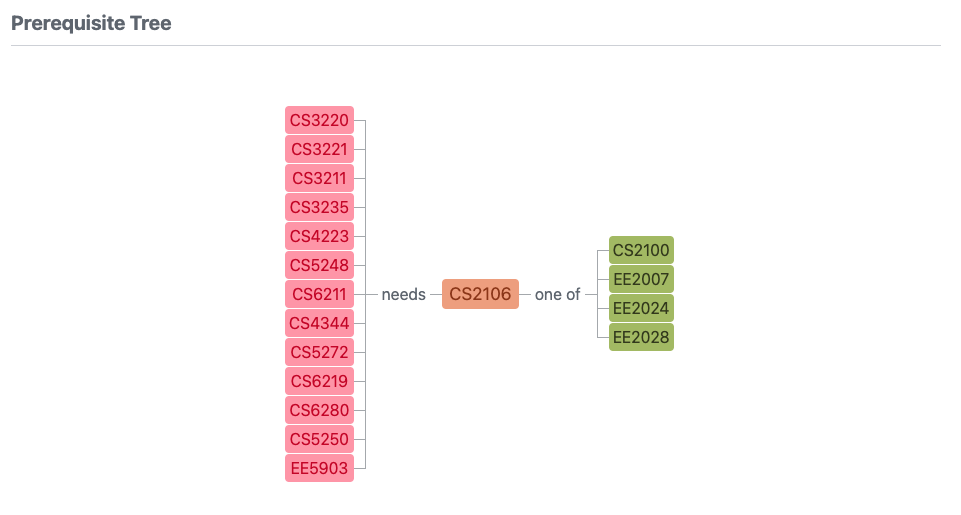
Students can refer to NUSMods to find out what modules one might unlock (red modules), after they complete a module (CS2106).
However, the red modules might have other pre-requisites which the student has not completed. Hence, the modules the student unlocks is only a subset of the red modules, and the student has to click one by one to understand what modules they can do next.
Many modules, but only 40 are relevant
There are 6000+ modules to choose from. Considering a 160MC degree, each student only does 40+ each.
Not knowing which module to clear first
For a freshman,
- Completing MA2001 unlocks MA2101/S, MA2214, MA3252
- Completing MA2002 unlocks MA2108/S, MA2311, MA2104, ST2131/MA2116, ST2334
Presented in this manner, MA2002 is likely the better option to take first. This is not clear to a freshman.
Hard deadlines for clearing modules
In order to complete a language studies minor, students need to study language modules up to the 6th level. This means 6 semesters of content, and this means that Y2S1 is typically the latest can start, if they are interested in a language studies minor.
Not sure what electives to take
While NUS does provide the degree requirements, it includes major electives that you can choose from, and you will have space for unrestricted electives as well. This means that there is a lot of room for variation.
Students might want to pursue a specific field in future, but they are not sure what modules they should pick for that field. Students might also be unsure if certain module combinations make sense, and they might want to find out what others are doing.
Target audience
All NUS undergraduates, and possibly pre-university students.
Motivation
General target audience
When you’re stuck not knowing what mods to take next semester, or just want general recommendations about what modules to take, your current alternatives are friends, seniors and perhaps the NUSMods Planner.
Many may have reached the point where either they don’t know what modules they are eligible for, or they lose track of what modules are required for them to graduate. This problem is made worse by the ever-changing graduation requirements, so reaching out to seniors may not be helpful at all.
Some students start a new semester not having enough module choices as a result of not taking enough prerequisites, forcing them to take unrelated modules for the upcoming semester.
Students considering specializations/double degree/major/minor
Some students might be interested in multiple different specializations, and they might not be sure what to pick. The overhead of having to keep track of what modules are completed for a certain specialization makes it troublesome to consider different specializations.
Objectives
- Increase clarity in degree planning
- Allow students to efficiently experiment with different degree paths
- Minimize mental overhead and time spent to source for degree data
- Improve module information accessibility
Core features
Degree as a graph
Since it is hard to visualize your degree requirements by just looking at text, in modtree we represent a degree plan as a graph. In this graph, each node is a NUS module, and a directed edge from A to B means that A is a pre-requisite of B.
With the full overview of modules and their relations, you gain a better understanding of your degree requirements. In the case of Computer Engineering students, you might be surprised and find out that ST2334 is a new indirect core module you have to clear.
Module suggestion
Building a graph requires a degree and a user. It is aware of degree requirements, and what modules you have already done. Being aware of all this information, modtree can suggest to you which modules you should take next, in order to keep your future the most open.
Currently, this is our priority criteria:
- Whether the module is part of your degree requirements or not
- How many modules would you unlock, if you were to complete this module
By prioritizing with these two criteria, you are sure to make constant progress in your degree, and that you will clear important modules first, so that you don’t run out of modules to take.
In the future, we intend to implement a reminder feature, to remind students to clear certain pre-requisites of higher modules they intend to take, so that they don’t have to worry about not being able to complete certain modules before graduation.
Community templates
Students might want to refer to seniors’ study plans, to see what kind of specializations to go for, or to find out if certain module combinations make sense.
In modtree, students will be able to search across existing the degrees made by the community, and fork a copy of their own.
Authentication and remote storage
In this technological age, it is common for students to have multiple devices. modtree provides user authentication with email and password via Auth0, so that students can access their modtree data across different devices.
User stories
Current undergrad not sure what to choose at ModReg
He can go on modtree and draw up a graph of the modules he’s already taken, and fill in his current degree requirements. Modtree will then be able to suggest to him what to do next in order to keep his options the most open (i.e. the modules that satisfy the most number of other module’s pre-requisites).
Current undergrad thinking of switching majors
He can fill in his current degree requirements, and then also the requirements of the degree he’s thinking of switching to. He can then draw out multiple graphs to try and see how his current modules done fits into either degree. Of course, he can also create, save, and even duplicate graphs as he modifies them, preventing the need to write everything from scratch.
Current undergrad unsure of how to fit in desired modules into their curriculum
Some modules are offered during particular semesters, and they could be pre-requisites for other desired modules. By building a degree in modtree and drawing up a graph, modtree will calculate the latest semester that the pre-requisite must be taken, in order to take the desired module before graduation.
Current undergrad wants to see if it is possible to graduate before the expected date
Some students might want to graduate in less than 4 years, or they might be double degree students who want to graduate within 4 years. By indicating the desired graduation date, modtree will assist in creating an overall degree plan, so the student knows how much and when to overload, and which modules to prioritize, so that there is no issue in clearing pre-requisites in time.
Tech stack
Frontend
React
This is the core language that all our frontend is based on. Specifically, we write with the intended style of React 17, with hooks instead of classes. So instead of having classes that extend a base React Component, our frontend components are Functional Components whose states are managed with hooks such as useState and useEffect.
React Flow
This is the library that is responsible for displaying nodes and edges that represent modules and their requirements. React Flow is an open-source tool which lets us skip past the issue of implementing togglable, draggable, (multi)selectable nodes, and get right into the core business of working on module dependency logic.
Next.js
Of course, we had the choice to use pure React.js, but we opted to use it on top of Next.js because of its extra routing capabilities. Through these routes we use their API functionality to manage authentication and centralize our backend calls.
Tailwind CSS
Tailwind CSS allows us to write CSS directly in JSX, a major convenience when we are building fresh components and are in the experimental stage. Though this breaks the philosophy of the cascade, it provides us a much needed speed boost when doing up proof-of-concepts. It also still lets us use vanilla CSS, which we do move over to for more mature components.
Backend
Express.js
Our server functions and API endpoints are handled by Express. Express provides us with route matching and parsing capabilities so we don’t have to worrying about implementing it.
Express validator
We use this library to validate the requests coming into the backend server. This is to reduce the risk of cross-site scripting attacks.
Auth0
Auth0 handles authentication for us, and also provides a very clean frontend to do so. However, its service to integrate with a database is a paid one, so we opted for a more detached approach. Auth0 only handles our user metadata, and nothing else. User data such as modules taken and degrees planned are still hosted on our database. These separate user entities are linked by Auth0’s user id.
Database
PostgreSQL
Postgres is our one and only database type (for now). We tried MySQL but ditched it because of the simple pragmatic reason that we couldn’t find free online hosts which offer a reasonable amount of storage space.
If we have bandwidth, we’d like to explore graph databases to handle our module dependency relations. Graph relation functions written in SQL will likely never be as natural as those written in GraphQL, so extending such functions will probably be easier with GraphQL.
TypeORM
TypeORM is a object-relational mapping (ORM) tool. It provides us with an object-oriented abstraction for the database, facilitating development.
TypeORM also has the flexibility to allow us to write SQL queries directly in TypeScript, and also plays nice with TypeScript’s types and interfaces.
Testing
Jest
We write our tests in TypeScript, using Jest as our testing framework.
Supertest
API endpoints technically require a running server to test fully, but we use supertest to mock a server and just test which functions are called at which endpoint.
GitHub Actions
We use GitHub Actions to automate our testing, and also to provide a third opinion on the state of our code.
Others
Nx
Nx is a build system for projects, and allows us to never have to build the same code twice. If it decides that a section of code hasn’t changed, it will not build/lint/test it again, and instead pull from either the local cache or the remote cache. This means if one developer has built a sub-project, another developer can benefit from his cache remotely.
As of Milestone 1, we were using Turborepo instead of Nx, but its remote caching was unreliable, so we didn’t get much benefit from it. Furthermore, with Turborepo, there was a node_modules directory under each of our sub-project. Nx, on the other hand, has only one node_modules from which every project reads from, allowing us to standardize even the version of each dependency across the whole project.
Nx also provides a graph visualizer that lets us see which sub-project depends on which other sub-projects. This is useful in quickly detecting project-level circular dependency. In fact, Nx throws an error before building if it detects a circular dependency.
Docs
Our docs runs on Next.js, powered by Nextra. and our content is mostly written in MDX, which is markdown that allows for JSX. We have 3 content tabs: Docs, API, Blog.
Docs tab
The docs tab consists of general information about modtree. It includes a developer guide, so it is easy to onboard new developers to the team.
Since Milestone 1, we have done weekly releases, summarizing our changes each week in the Changelog section. A more detailed changelog is avaliable at our project repository’s root.
API tab
The API tab documents all our API endpoints. We split each entity into its own page.
Each endpoint has
- Input parameters (body, query, param)
- Sample response
- Response schema
Our sample responses are derived from testing each API endpoint. The response schemas are programatically generated from the sample responses using our own utility function.
We chose to use our own utility function because the alternative options did not match our requirements. We considered swagger.io, which produces a rather verbose output. It also doesn’t integrate well with our docs as it generates a new page, so we realized that we just required a utility function that takes in a JSON response, and converts it into a schema. Next, we considered some NPM packages. The relevant packages we found either didn’t work well, or they were again too verbose. Hence, we decided to write our own utility function, so that we can customize it to our liking.
Do refer to our video if you want to understand more about how we manage our API information in our MDX pages.
Blog tab
The Blog tab contains our Milestone READMEs.
Software engineering principles
Our docs runs on Next.js, and our content is mostly written in MDX, which is markdown that allows for JSX. We have 3 content tabs: Docs, API, Blog.
Docs
The docs tab consists of general information about modtree. It includes a developer guide, so it is easy to onboard new developers to the team.
Since Milestone 1, we have done weekly releases, summarizing our changes each week in the Changelog section. A more detailed changelog is avaliable at our project repository’s root.
API
The API tab documents all our API endpoints. We split each entity into its own page.
Each endpoint has
- Input parameters (body, query, param)
- Sample response
- Response schema
Our sample responses are derived from testing each API endpoint. The response schemas are programatically generated from the sample responses using our own utility function.
We chose to use our own utility function because the alternative options did not match our requirements. We considered swagger.io, which produces a rather verbose output. It also doesn’t integrate well with our docs as it generates a new page, so we realized that we just required a utility function that takes in a JSON response, and converts it into a schema. Next, we considered some NPM packages. The relevant packages we found either didn’t work well, or they were again too verbose. Hence, we decided to write our own utility function, so that we can customize it to our liking.
Do refer to our video if you want to understand more about how we manage our API information in our MDX pages.
Blog
The Blog tab contains our Milestone READMEs.
Testing
Database testing
For database functions, we mock up a database with the minimum records needed for the test, then run the function and then assert a few key points.
These tests are written with Jest and are per-project, meaning that if a project has been tested before, and no code has changed, it will not be tested again.
While developing, tests help us know if we’re on the right track, and with every pull request we have GitHub Actions run the tests to give us extra reassurance that the code functions as expected.
Server testing
API endpoints technically require a running server to test fully, but we use supertest to mock a server and just test which functions are called at which endpoint.
Our server tests ensure that API endpoints are functioning and at the right paths. They also help to ensure that we do not have namespace collisions in the endpoint paths.
In our server testing, we do not test for the logic. This is because for every API endpoint, we have a corresponding database method, and they are thoroughly tested by the database testing.
Evaluator’s testing
Sign up/login to modtree.vercel.app. You should be redirected to Auth0, and after you login, you will get redirected back to modtree.
Search for any module, and click on a suggestion. You should see a modal pop up. This modal shows module information.
After signing in, click on the user icon at the top-right. You should see your own email.
Roadmap
What’s done
The bulk of our progress in Milestone 1 was in our database functions. We chose to focus development there at the start because we wanted a solid foundation to build things from.
Now, at Milestone 2, we have implemented every foreseeable database function, and have started work in the frontend.
What’s next
After Milestone 2, we have a solid backend implementation, and we have also implemented many frontend components. Some core features are present in the backend database functions, and we have written tests to confirm their accuracy.
Features
With this solid foundation, the focus for Milestone 3 will be to push the core features of modtree. This includes
- Saving the user’s state across sessions
- Display module suggestions (in frontend)
- Toggle between degrees and/or graphs
- Building your own degree plan
Testing
- Improve code coverage and add more tests for errors and rejection cases
- (Maybe) Use Cypress for end-to-end testing
Performance
- Improve speed by using a faster database (NoSQL/key-value store) for caching recent requests
- Use Next API serverless functions for read-only operations to work around Heroku’s cold starts