Splashdown
Sunday, August 14th, 2022

- Name
- Nguyen Vu Khang
- @nguyenvukhang

- Name
- Tan Wei Seng
- @weiseng18
Problem
Hard to visualize degree requirements
In NUS, degree requirements are presented in textual form. The required modules are usually presented in a bullet point list. It is not obvious when you can take these modules, and how they are related to each other.
Additionally, there are many ways to go about completing the same degree. You can choose to clear all your core modules first, or you can explore electives and specializations first.
Degree requirements aren’t exhaustive
In some degrees, in order to clear the pre-requisites to study some core modules, you even need to study modules outside of the core list. For example, in Computer Engineering, EE4204 Computer Networks is listed as a degree requirement. However, one of its pre-requisites, ST2334, is not listed in the core modules.
Module relations are complicated
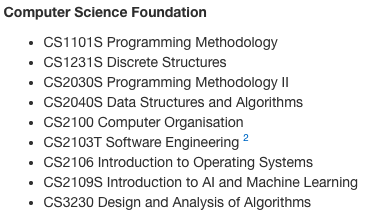
Students can refer to NUSMods to find out what modules one might unlock (red modules), after they complete a module (CS2106).
However, the red modules might have other pre-requisites which the student has not completed. Hence, the modules the student unlocks is only a subset of the red modules, and the student has to click one by one to understand what modules they can do next.
Many modules, but only 40 are relevant
There are 6000+ modules to choose from. Considering a 160MC degree, each student only does 40+ each.
Not knowing which module to clear first
For a freshman,
- Completing MA2001 unlocks MA2101/S, MA2214, MA3252
- Completing MA2002 unlocks MA2108/S, MA2311, MA2104, ST2131/MA2116, ST2334
Presented in this manner, MA2002 is likely the better option to take first. This is not clear to a freshman.
Hard deadlines for clearing modules
In order to complete a language studies minor, students need to study language modules up to the 6th level. This means 6 semesters of content, and this means that Y2S1 is typically the latest can start, if they are interested in a language studies minor.
Not sure what electives to take
While NUS does provide the degree requirements, it includes major electives that you can choose from, and you will have space for unrestricted electives as well. This means that there is a lot of room for variation.
Students might want to pursue a specific field in future, but they are not sure what modules they should pick for that field. Students might also be unsure if certain module combinations make sense, and they might want to find out what others are doing.
Target audience
All NUS undergraduates, and possibly pre-university students.
Motivation
General target audience
When you’re stuck not knowing what mods to take next semester, or just want general recommendations about what modules to take, your current alternatives are friends, seniors and perhaps the NUSMods Planner.
Many may have reached the point where either they don’t know what modules they are eligible for, or they lose track of what modules are required for them to graduate. This problem is made worse by the ever-changing graduation requirements, so reaching out to seniors may not be helpful at all.
Some students start a new semester not having enough module choices as a result of not taking enough prerequisites, forcing them to take unrelated modules for the upcoming semester.
Students considering specializations/double degree/major/minor
Some students might be interested in multiple different specializations, and they might not be sure what to pick. The overhead of having to keep track of what modules are completed for a certain specialization makes it troublesome to consider different specializations.
Objectives
- Increase clarity in degree planning
- Allow students to efficiently experiment with different degree paths
- Minimize mental overhead and time spent to source for degree data
- Improve module information accessibility
User stories
Current undergrad not sure what to choose at ModReg
He can go on modtree and draw up a graph of the modules he’s already taken, and fill in his current degree requirements. Modtree will then be able to suggest to him what to do next in order to keep his options the most open (i.e. the modules that satisfy the most number of other module’s pre-requisites).
Current undergrad thinking of switching majors
He can fill in his current degree requirements, and then also the requirements of the degree he’s thinking of switching to. He can then draw out multiple graphs to try and see how his current modules done fits into either degree. Of course, he can also create, save, and even duplicate graphs as he modifies them, preventing the need to write everything from scratch.
Current undergrad unsure of how to fit in desired modules into their curriculum
Some modules are offered during particular semesters, and they could be pre-requisites for other desired modules. By building a degree in modtree and drawing up a graph, modtree will calculate the latest semester that the pre-requisite must be taken, in order to take the desired module before graduation.
Current undergrad wants to see if it is possible to graduate before the expected date
Some students might want to graduate in less than 4 years, or they might be double degree students who want to graduate within 4 years. By indicating the desired graduation date, modtree will assist in creating an overall degree plan, so the student knows how much and when to overload, and which modules to prioritize, so that there is no issue in clearing pre-requisites in time.
User flow
With core business logic implemented as part of Milestone 3, we want to be clear about what user actions there can be at any point in time, so that we can write end-to-end tests for these actions, to confirm that they work.
The diagram at this miro board summarizes what a user can do, by indicating what actions a user can take at certain screens.
Tech stack
Building
TypeScript
TypeScript is the programming language of Modtree. We find that types help to communicate a large part of what each function and data structure is trying to accomplish.
Apart from having static types, it is also useful that the entire tech stack can be written in this language, so sharing code is highly feasible.
Nx
Nx is a build system for projects, and allows us to never have to build the same code twice. If it decides that a section of code hasn’t changed, it will not build/lint/test it again, and instead pull from either the local cache or the remote cache. This means if one developer has built a sub-project, another developer can benefit from his cache remotely.
As of Milestone 1, we were using Turborepo instead of Nx, but its remote caching was unreliable, so we didn’t get much benefit from it. Furthermore, with Turborepo, there was a node_modules directory under each of our sub-project. Nx, on the other hand, has only one node_modules from which every project reads from, allowing us to standardize even the version of each dependency across the whole project.
Nx also provides a graph visualizer that lets us see which sub-project depends on which other sub-projects. This is useful in quickly detecting project-level circular dependency. In fact, Nx throws an error before building if it detects a circular dependency.
Webpack
Webpack lets us bundle a large amount of code into just one executable JavaScript file, allowing for a minimal production runtime file.
Frontend
React
This is the core language that all our frontend is based on. Specifically, we write with the intended style of React 17, with hooks instead of classes. So instead of having classes that extend a base React Component, our frontend components are Functional Components whose states are managed with hooks such as useState and useEffect.
React Flow
This is the library that is responsible for displaying nodes and edges that represent modules and their requirements. React Flow is an open-source tool which lets us skip past the issue of implementing togglable, draggable, (multi)selectable nodes, and get right into the core business of working on module dependency logic.
Redux
Redux is a core part of our frontend. It centralizes our application’s state and abstracts the logic away from frontend components. This helps us to get a single source of truth for the global state of our application, so that any changes a user makes is correctly updated throughout our application.
Next.js
Of course, we had the choice to use pure React.js, but we opted to use it on top of Next.js because of its extra routing capabilities. Through these routes we use their API functionality to manage authentication and centralize our backend calls.
Tailwind CSS
Tailwind CSS allows us to write CSS directly in JSX, a major convenience when we are building fresh components and are in the experimental stage. Though this breaks the philosophy of the cascade, it provides us a much needed speed boost when doing up proof-of-concepts. It also still lets us use vanilla CSS, which we do move over to for more mature components.
Backend
Express.js
Our server functions and API endpoints are handled by Express. Express provides us with route matching and parsing capabilities so we don’t have to worrying about implementing it.
tRPC
tRPC helps us to statically type APIs. We are thus able to share types between our client (frontend) and server, so that we are confident in using our API correctly. Given that our project’s main language is TypeScript, this is a very useful addition to our application.
NextAuth.js
With NextAuth.js, users can now authenticate using social logins. We currently support Google, Github, and Facebook.
Since our target audience is NUS undergraduates or incoming undergraduates, they are likely to own one of the abovementioned social accounts. By having social logins, we reduce the barrier of entry for using our app, encouraging users to sign up as it is hassle-free.
Database
PostgreSQL
Postgres is our one and only database type (for now). We tried MySQL but ditched it because of the simple pragmatic reason that we couldn’t find free online hosts which offer a reasonable amount of storage space.
If we have bandwidth, we’d like to explore graph databases to handle our module dependency relations. Graph relation functions written in SQL will likely never be as natural as those written in GraphQL, so extending such functions will probably be easier with GraphQL.
TypeORM
TypeORM is a object-relational mapping (ORM) tool. It provides us with an object-oriented abstraction for the database, facilitating development.
TypeORM also has the flexibility to allow us to write SQL queries directly in TypeScript, and also plays nice with TypeScript’s types and interfaces.
Testing
Jest
We write our tests in TypeScript, using Jest as our testing framework.
At Milestone 2, we spin up a database instance whenever we run unit tests for our core functionality. Since we also wanted to keep our code coverage high, this made our unit tests run for longer than 2 minutes, both locally and in the CI.
The bottleneck of the unit tests is spinning up the database instance. Hence, we decided to introduce mocking to eliminate such external dependencies from unit testing. As a result, our unit tests run in 10 seconds now.
GitHub Actions
We use GitHub Actions to automate our testing, and also to provide a third opinion on the state of our code. It runs for every pull request and every merge, so that we are confident that our code changes do not break other functionalities.
Cypress
We use Cypress for end-to-end testing. Cypress spawns a browser and helps us to simulate user actions such as clicking and typing into a text box, effectively simulating a real user. We are also able to assert that certain elements are loaded in the page. Overall, this helps us to confirm that our core business logic works.
Docs
Our docs runs on Next.js, and our content is mostly written in MDX, which is markdown that allows for JSX. We have 3 content tabs: Docs, API, Blog.
Docs
The docs tab consists of general information about modtree. It includes a developer guide, so it is easy to onboard new developers to the team.
Since Milestone 1, we have done weekly releases, summarizing our changes each week in the Changelog section. A more detailed changelog is avaliable at our project repository’s root.
API
The API tab contains Swagger documentation for our OpenAPI routes. This guides users in programmatic usage of modtree.
Blog
The Blog tab contains our Milestone READMEs.
Software engineering practices
Unit tests
To enable major code refactoring should the need arise, it’s far more comforting to have a reliable set of unit tests to let you know that your code does in fact still perform in the same way as it used to.
Integration tests
To ensure a base level of confidence that our backend code runs smoothly in production, we have integration tests that test our functions against a real database.
End-to-end tests
We use end-to-end tests to ensure that any changes we make to our codebase does not affect our business logic. Thus, we are more confident to make releases to our production environment.
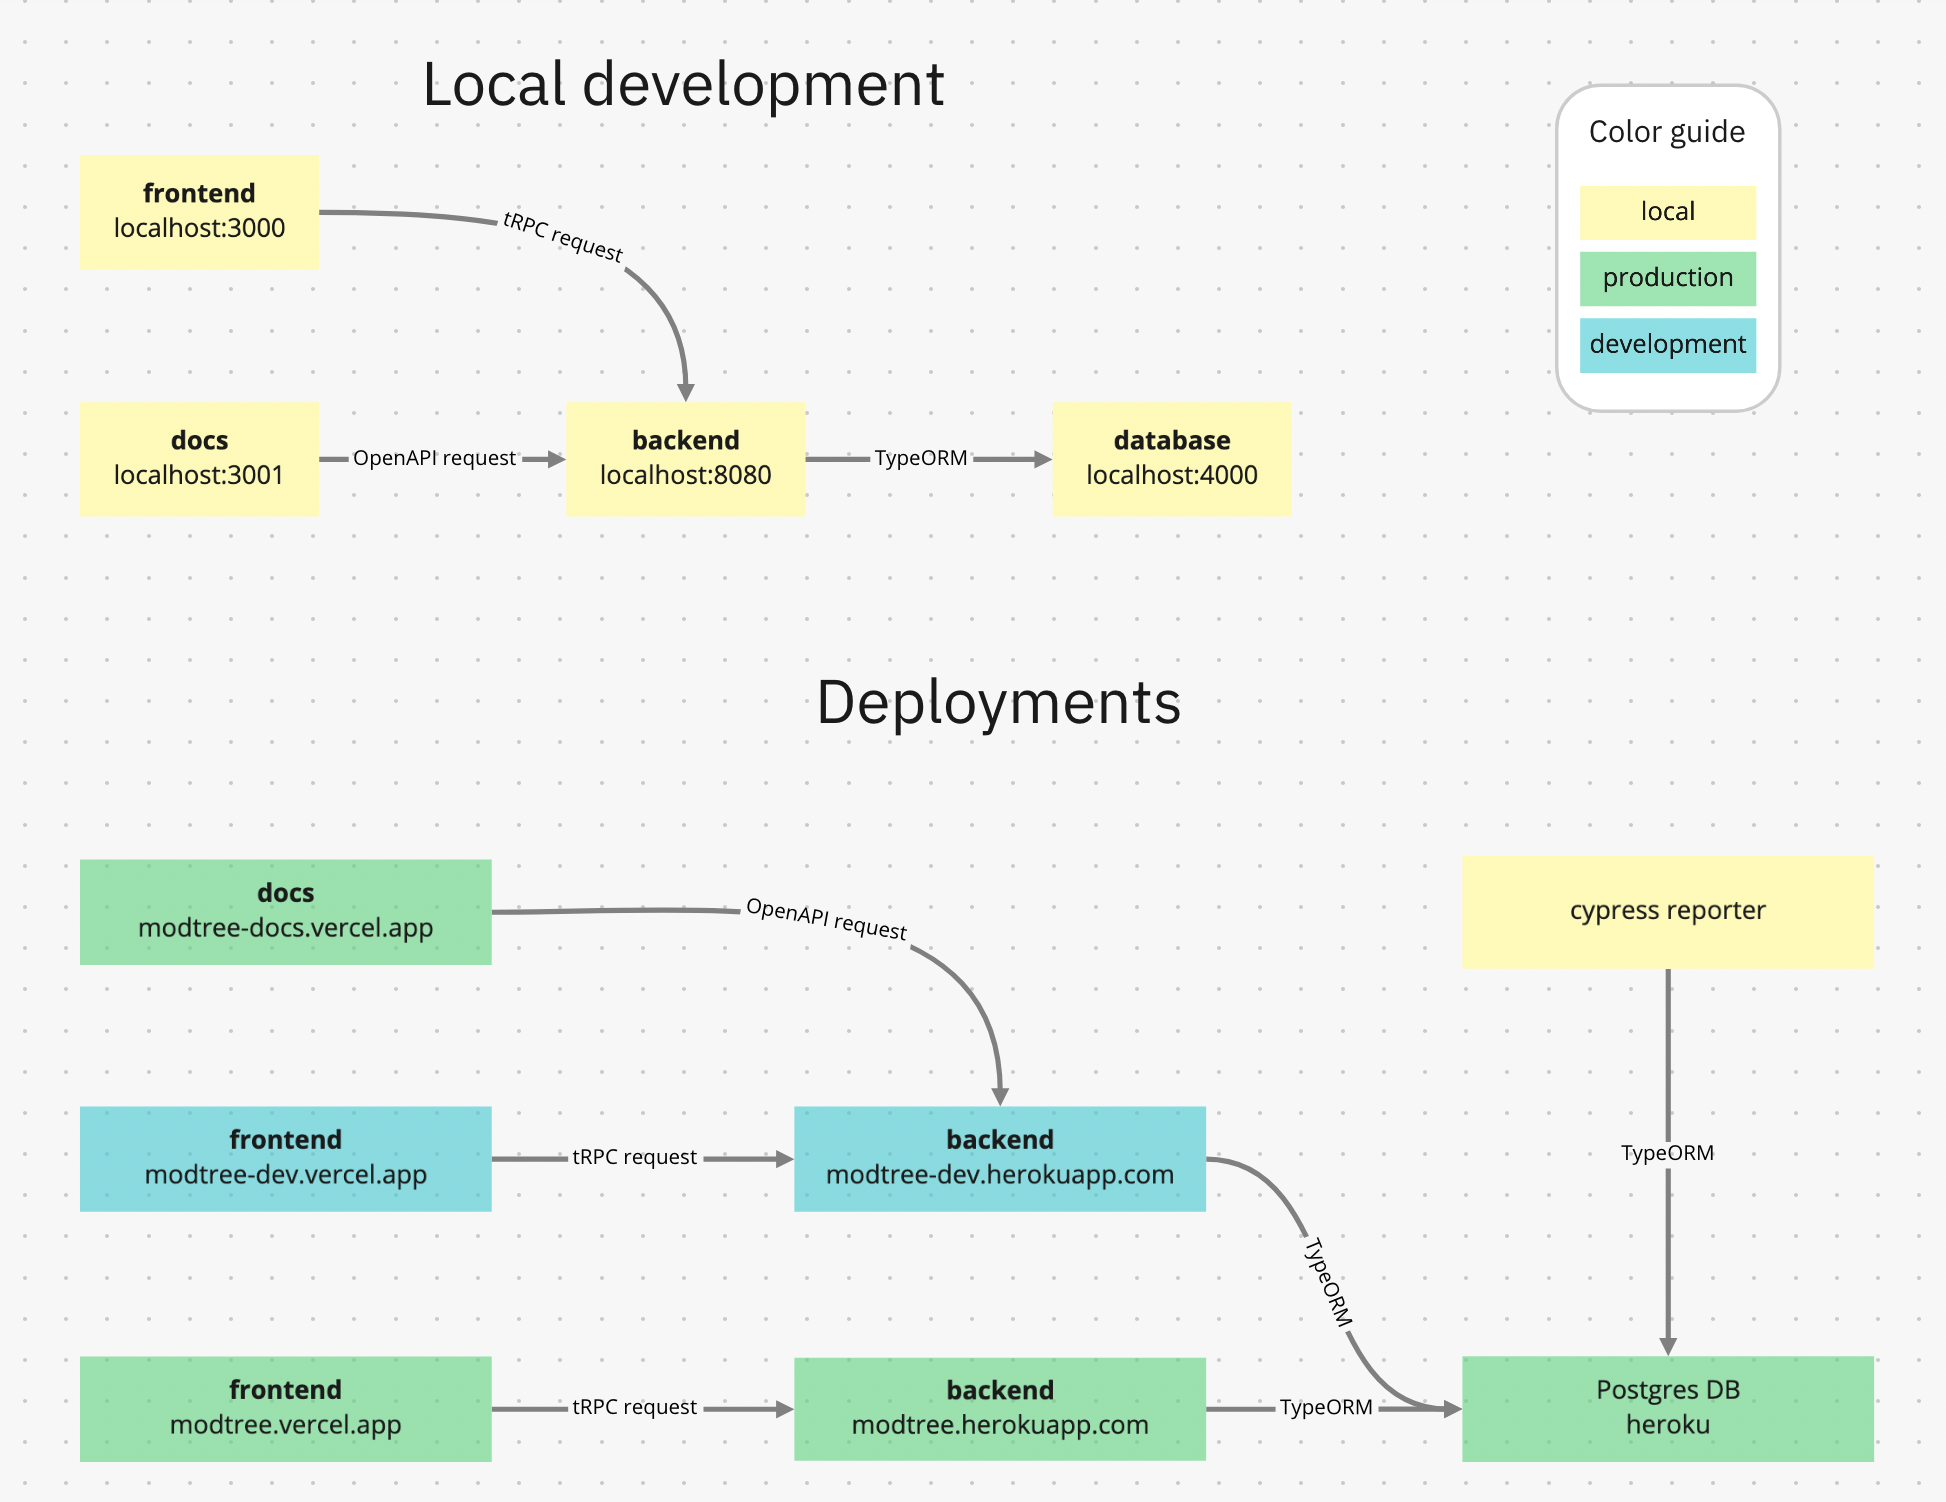
Separate production & development deployments
Having separate deployments allows us to have more confidence in pushing our latest code live. If our latest code has a bug, it only affects the development deployment, and not the main production environment. This helps us to maintain high uptime.
Continuous integration
Unit tests are ran on every key event. Pushes to particular branches, whenever a pull request is opened, whenever someone requests for a PR review, etc. Test results are also sent to a telegram group so that we don’t have to check Github Actions all the time.
Continuous delivery
Frontend, backend, and documentation deployments are automatic. When we merge a pull request to main, the development deployment gets updated. When we make a Github Release, the production deployment gets updated.
Branch protection rules
The main branch requires all CI checks to pass before being able to merge. This helps ensure a higher base level for the standard of production code.
Keys security
No API keys are exposed on our public repo. We use .env files to safe-keep our keys, and we only commit an .env.example file to show what keys we’re expecting a developer to have.
Version control
We use git for version control, enabling multiple people to work on the same project.
Commit messages
After Milestone 1, we have begun to follow the conventional commit message format for clarity in what we do.
Test result logging (cypress)
One thing unique about Cypress’ end-to-end tests is that they take far longer to run than unit tests and integration tests. Also, at the time of writing we have not managed to consistently pass all the Cypress tests we wrote for ourselves, so we want finer control than what automated CI runs can offer. Hence we have a problem:
I want to know if at the given commit, whether or not I pass all Cypress tests. There are a few options:
- Run all tests at once, and look at the compiled result. Pro: can see the exact state of the commit. Con: the entire run is unreasonably long, and is not feasible to do a code-test-fix-repeat cycle on this slow feedback loop.
- Run one test. Pro: test runs fast. Con: if I pass three tests and the fourth one fails, and I debug the fourth one, I now have to note down somewhere the status of the first three or I will have to re-run them. This is not feasible too because debugging the fourth test while remembering the status of tests ran is not reliable.
The universal downside here is that there is no way of remembering what’s the status of the tests at a previous commit, so git bisect will be as painfully slow as scenario 1, since we have to rerun all Cypress tests to know if the commit is good or bad.
The solution is to implement a system that tracks Cypress test run results. For this, we have a few elements:
- A custom Cypress reporter.
- A viewer for Cypress runs related to the current state of code.
Custom Cypress reporter
A reporter is an extension of a test runner whose job is to print out the status of the tests as it runs. It can either print to the current process’ stderr and stdout, or it can write to a file such as *.xml or *.json for later analysis.
Initially, we wrote a custom reporter that saves tests results to a commited results.json file, but this was impractical because it polluted our diff analysis for merges.
We then decided to do it the right way and write the results to a remote database so we can retire the ever-growing results.json file. The new problem encountered is that now, asynchronous calls are involved (since we’re using an ORM call to save the data), but then Cypress kills the reporter as soon as the last test ends, without waiting for asynchronous tasks to finish.
To work around this, we spawn a fork of the node process of the reporter, and detach it from the router entirely. This allows the fork to survive the reporter’s termination. So now our reporter’s job is simplified. Upon starting, it spawns the fork. Every time a test result is received, it emits a signal to the fork and the fork will send an asynchronous call to the database to write the data. This call will be loaded on a queue. Upon the reporter reaching and finishing the last test, the fork will receive a signal to resolve all remaining promises in that queue and only then close.
Viewer for test runs
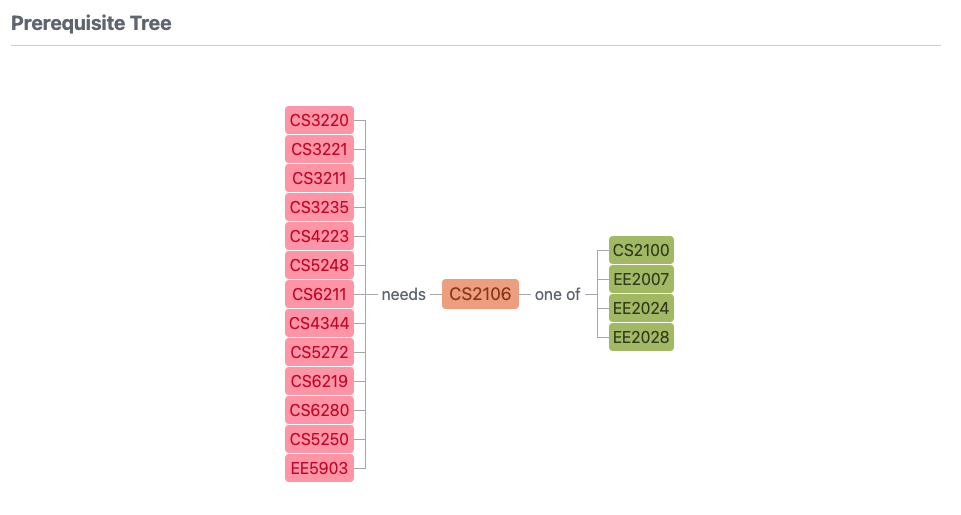
The command to view test runs is yarn cy ls. Not every run is relevant to the current commit, so yarn cy ls will obviously not show every run in the database. It will pick only the runs whose commits are
- descendants of
origin/main, but notorigin/mainitself, - and are ancestors of the current commit, or the current commit itself.
From these valid commits, it will choose the latest one.
This applies for all cypress test files found by glob pattern matching in a particular directory in our workspace, and if no data is found for the test, the user will see that too.
Here’s an example output:
Merging strategy
When PRs are merged to origin/main, we use the squash-and-merge strategy. This will effectively discard all commits in the PR branch and create exactly one new commit on origin/main that will contains all the changes in that PR. This commit’s only parent is the previous commit of origin/main.
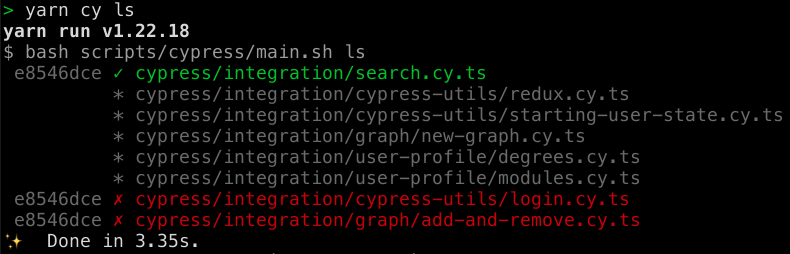
Here’s how our git log looks like with this workflow:
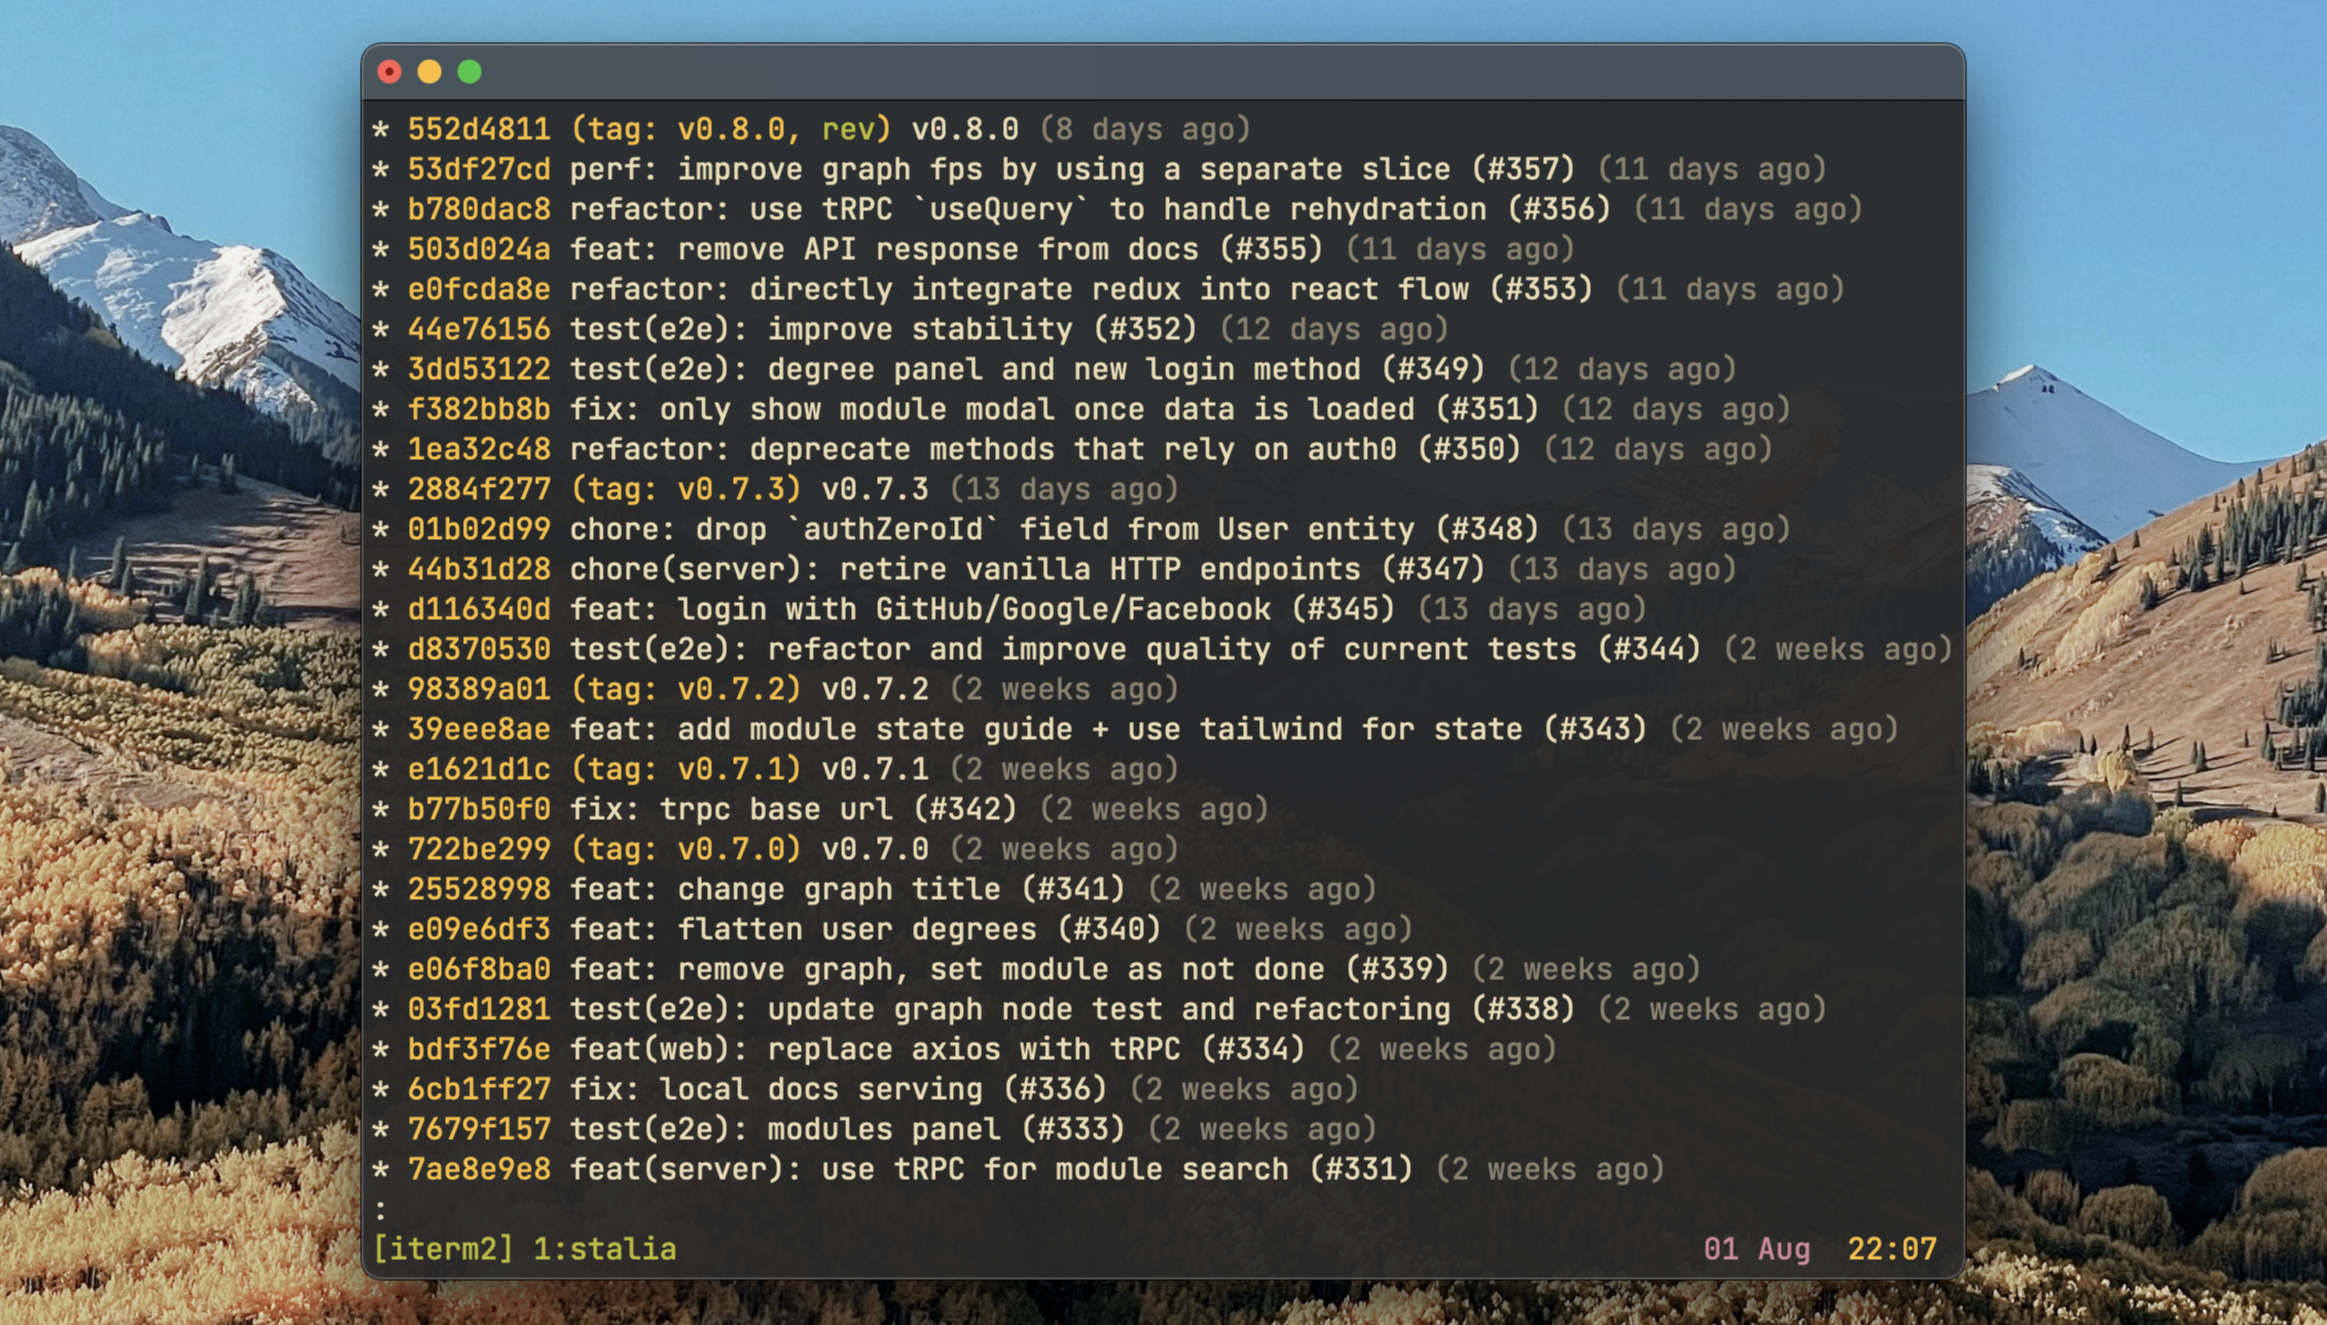
GitHub (and git's) default merge strategy is fast-forward, which keeps all the commits of the non-main branch, and creates a new commit that has two parents: the latest commit on the non-main branch, and the latest commit of the main branch.
Here’s how it looked like in practice:

We initially didn’t put too much thought into this and started off with the fast-forward merges. The decision to use a squash-and-merge strategy was a conscious one for a few reasons:
Pros of squashing (as opposed to fast-forwarding)
origin/main's git history is concise. Every PR/merge corresponds to exactly one commit onorigin/main's history.- Every commit on
origin/main's history is stable, since we require that a branch passes all tests before we merge it toorigin/main. - Linear git history. This facilitates
git bisectnicely because there’s only one route of history beforeorigin/main.- One time, we discovered a bug on
origin/mainthat we know didn’t exist before. By settingHEADasbisect badand a point in history known to be stable asbisect good,git bisectreally quickly brought us to the bad commit. (It effectively does a binary search for the bad commit, with ourselves and our tests being the evaluator of whether or not the commit is bad). - This has helped us and will continue to help us locate bugs that are several merges before
HEADvery quickly.
- One time, we discovered a bug on
Cons of squashing
- After squashing, the new commit created has only one parent, and therefore now has an unrelated history to all other PR branches.
- Here’s an example of how it’s inconvenient:
- PR #1 and PR #2 are written atop the same
origin/maincommit:933293ad, and have completely disjoint changes. PR #1 editspackage.jsononly, and PR #2 editstsconfig.jsononly. - PR #1 is squash-merged into
origin/main. A new commit is created:3f6e6357. - PR #2 will now be unable to merge into
origin/mainautomatically, even though to a human it’s clear that it still can be, since its changes are completely unrelated to PR #1.gitcomplains that PR #2 has an unrelated history to3f6e6357. - To merge PR #2, we will have to rebase PR #2’s changes on top of
3f6e6357, and only then squash-merge it toorigin/main.
- PR #1 and PR #2 are written atop the same
- Ultimately, this limits us to only be able to merge one PR at a time, since after merging any PR, all other PRs become temporarily invalid.
- Here’s an example of how it’s inconvenient:
The pros and cons of squashing against that of fast-forwarding are almost perfect inverses. Fast-forwarding leaves behind a messier git history, containing debug commits that no one really needs to see, while giving us the ability to merge multiple PRs at once.
The reason why we went with squash-merging in the end is because we value code stability and history readability over immediate development speed. The reason why we rank our priorities in that way is because we feel that in the long term, the stability and readbility inherently nutures sustained development pace.
Local git workflow: git worktrees
The standard, flagless, way to clone a git repository is to run git clone <repository>. For example, git clone git@github.com:modtree/modtree.git.
This will configure a new directory modtree to hold two things:
- a git workspace: a snapshot of the git project as of the commit that you cloned at. This contains human-readable files which are the files that we actually code with.
- a git repository: the
.gitdirectory within themodtreedirectory. This contains files that onlygititself will read in order to generate things like history, current status, or a new commit.
.
├── .git/
├── src/
├── tsconfig.json
└── package.json
However, in a workflow involving more than one developer, there are some issues. Say Abby tells Zelda to go see what’s wrong with commit 037c10e9, while Zelda is working on a different commit on his own branch. Zelda will then have to stash away his changes with either git stash or a throwaway commit, and then run something to the effect of git checkout 037c10e9 to see what’s up with that commit.
This can be very disruptive to Zelda’s workflow.
If Zelda was using git worktrees, his directory structure will instead look like this:
.
├── .git/
└── zeldy
   ├── .git # this is a file referencing ./.git/
   ├── src/
   ├── tsconfig.json
   └── package.json
Now, all Zelda needs to do is to create a new directory and load commit 037c10e9 in that, and come back to his previous directory later.
.
├── .git/
├── zeldy
│  ├── .git
│  ├── src/
│  ├── tsconfig.json
│  └── package.json
└── tomodachi  # run `git reset --hard 037c10e9` in here
   ├── .git
   ├── src/
   ├── tsconfig.json
   └── package.json
Automatic env loading
To keep secrets, we store all sensitive strings such as keys, IDs, and tokens in a single .env file at the workspace root. One problem encountered is that every time we edit this file, we have to remember to edit it for every worktree we have checked out.
Our solution is to save an .env file somewhere in our local system, and symlink it to every workspace root. Now, if I edit .env in the dev branch, the real .env elsewhere gets edited and changes are received in all other branches as well.
To make the entire .env experience seamless, we have wrote a script that fires everytime we run yarn. Running yarn is rudementary because not only is it the command you first run to install npm dependencies, it’s also the command you run to update them.
So now, after yarn has finished running, our script will kick in and do two things:
- symlink
.envinto the project root - assert that the symlink is successful, and alert the user if it failed somehow.
Code review rubric
To merge a PR into origin/main, we require approval from the other developer. We check for the following things:
- PR is mergeable into
origin/main(we make use of squash-and-merge strategy) - CI tests pass
- Build passes
- Code is readable and can be understood
Since we have automatic code formatting via git hooks, we do not check for code formatting.
Code formatting
Our project is written almost entirely in TypeScript, so we use prettier to format our code.
At our project root we have two files that tell prettier how to run:
-
.prettierignoreTypeScript is a compiled language, but it actually just compiles to JavaScript, an interpreted language. So technically the build output of TypeScript is formattable by
prettier.However, formatting build output is both time-consuming and redundant, since it tends to be very long and no one reads it. So we send all the build output to a directory called
distat the workspace root, and we tell prettier to ignore all files in dist. -
.prettierrcHere, we specify some opinionated configurations that we’d like prettier to follow, such as a preference of single quotes over double quotes, and the preference of no ending semi-colons. Everything here is purely aesthetic.
We make use of git hooks to automatically run prettier before each commit, so our code is always well formatted. How it works is that after we have staged our changes, running git commit will tell git to create a new commit. But just before the new commit is created, the hook script will check for files that changed from the last commit, and use prettier to format all the files that changed.
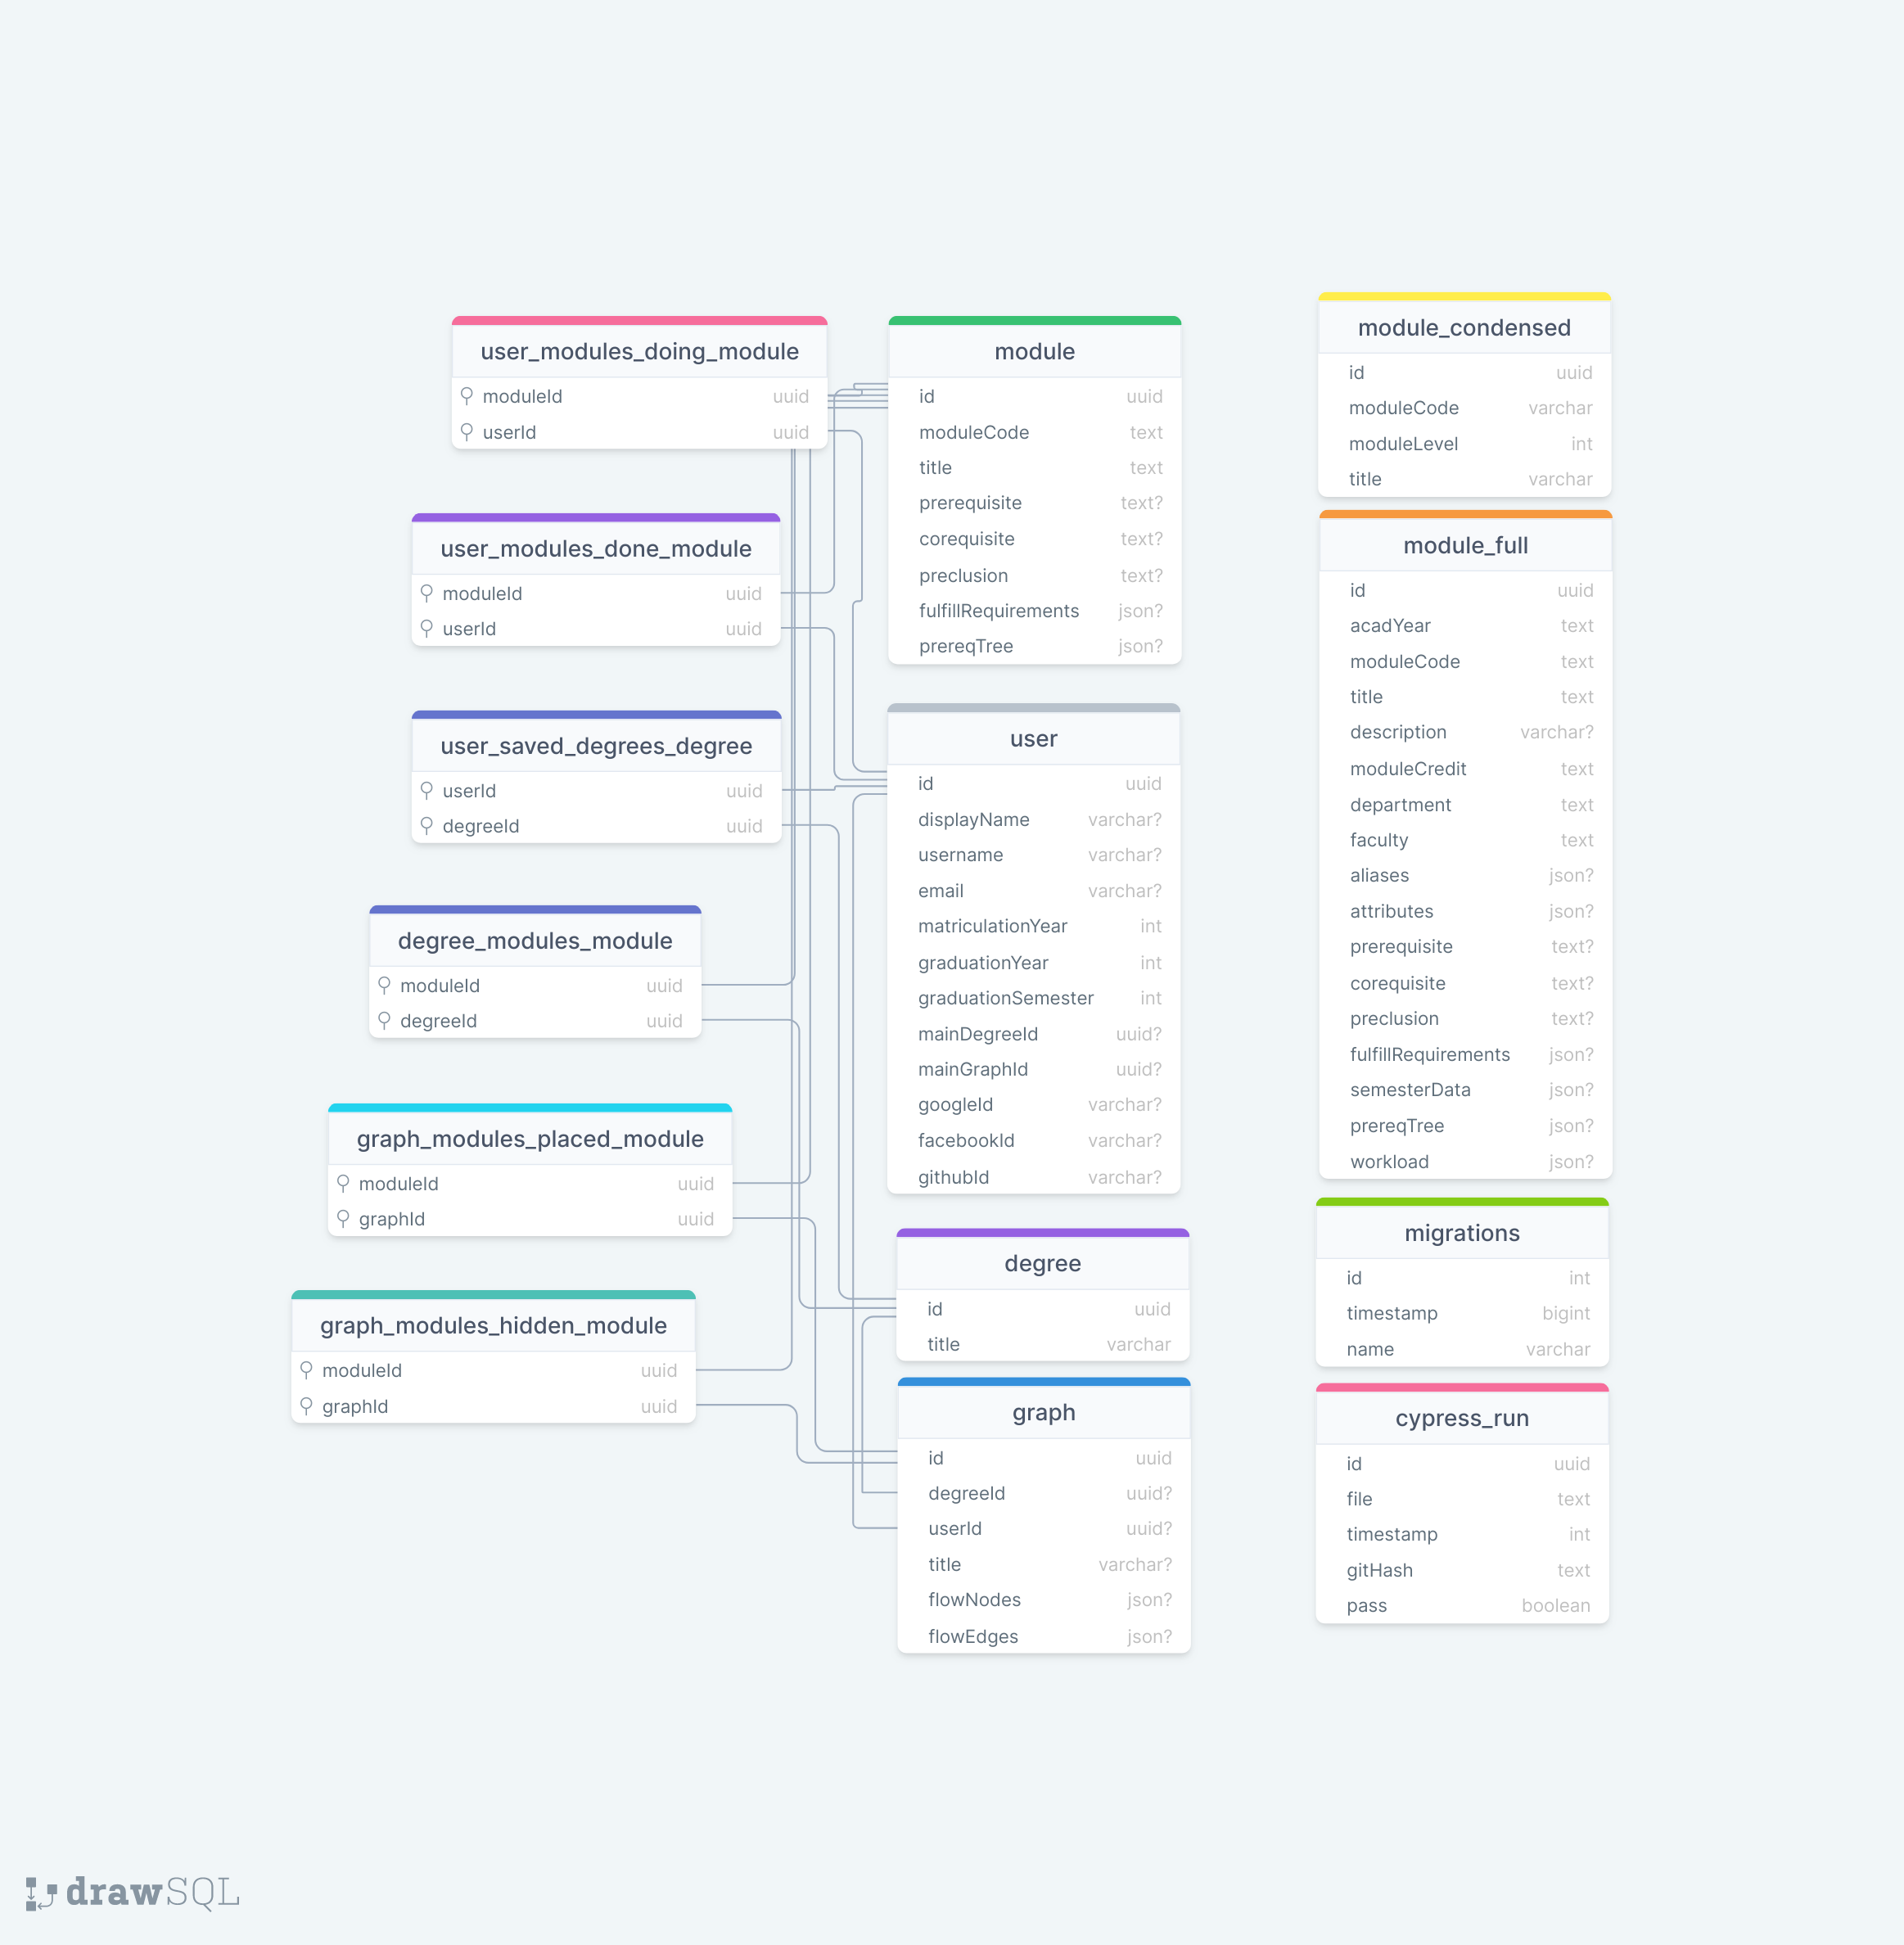
Diagrams
ER diagram
Architecture diagram
Features
tl;dr
What’s done
The bulk of our progress in Milestone 1 was in our database functions. We chose to focus development there at the start because we wanted a solid foundation to build things from.
At Milestone 2, we have implemented every foreseeable database function, and have started work in the frontend.
Now, as of Milestone 3, we have implemented the full flow of a user planning a degree. Also, the entire user state is persisted in database. Users can toggle between graphs, add and remove modules, mark each module as done/doing/planned, and so on.
What’s next
After Milestone 3, we will be working on the stability of the 10+ core functions that users can execute while manipulating their own data. After that, we will look into implementing features such as module suggestion and community module relations.
What's done
End user features
Degree as a graph
Like how in role-playing games you can build your character’s skill tree, modtree lets you build your degree plan like a skill tree but out of modules instead of skills.
We call it a graph because modules can have multiple pre-requisites, and we like to be technically correct.
In this graph (or tree), each node is a NUS module, and a directed edge from A to B means that A is a pre-requisite of B.
With the full overview of modules and their relations, you gain a better understanding of your degree requirements. In the case of Computer Engineering students, you might be surprised and find out that ST2334 is a new indirect core module you have to clear.
Authentication and remote storage
In this technological age, it is common for students to have multiple devices. Modtree provides user authentication with through popular account providers, specifically Google, Facebook, and also GitHub. Users can log in with any of these providers and connect back to the same account.
User’s graphs and degrees are saved remotely, so as long as they log back in to the same account, they have full access to previously entered data.
Developer features
Faster server builds
Instead of using Nx to build our server, we now only use it to check for circular dependencies. We use webpack to build it instead, which take the build time from at least 20s to an average of 4s. With webpack, we can also monitor the codebase for live changes and rebuild the server in realtime, allowing for a smoother developer experience.
CI scripting
Make use of GitHub workflow’s matrix strategy to execute multiple tests at once without having to manually define multiple jobs.
Test commands to be ran on the CI checks are abstracted out to a simple json file which we can edit easily.
Custom GitHub action
Previously, we relied on a GitHub Marketplace action to send test reports to telegram. Now, we have a custom action at .github/actions in our repository. This grants us fine-tuned control over how results are reported, and also lets us have a cleaner GitHub Workflow yml file.
Improved test runner
With Nx, we were able to run tests per-project. However, not all projects are created equal and some required further slicing and dicing of tests. So we wrote a test runner that lets us orchestrate testing more finely, called with yarn test from workspace root.
It lets us define however many Jest projects we want, instead of having one Jest project per sub-directory of apps and libs. This lets us run each Jest project independently.
It also lets us group tests together. We have an alias yarn test core which runs all unit tests for graph, degree, user, and module functions. This usually serves as a first pass before moving on to check with integration tests or the full test suite.
It has a utility that scans the entire workspace for new Jest configs and add them to the tests.json at root, where we define all configs for tests.
Mocked unit tests
Mock database and imported library functions to significantly boost the speed of our unit tests. Compared to our previous set of fastest tests, these run at least 5x faster, since they can also run in parallel. This is a major boost to our code-time productivity since the feedback loop is faster.
Semi-automatic migration script
Whenever there’s a change in database schema, we need to run a migration to get the production database up to date with the new schema. For this we wrote three scripts:
- A script to compare the current state of production schema against our current code’s schema.
- when there’s a change in schema

- when the schema is up to date
Containerization
An image of our database is on hub.docker.com, along with an image of our server. The source of these images can be found in our repo, and though we haven’t used them to their full potential, having these ready is the first step towards a manual serverless deployment or a scalable server cluster.
Also, having these images means that developers will have an easier time setting up development environment. Instead of having to follow a specific set of instructions to set up something like PostgreSQL bare-metal, they can just download Docker and spin up an instance of the image, and have everything ready.
What's next
Module suggestion
Building a graph requires a degree and a user. It is aware of degree requirements, and what modules you have already done. Being aware of all this information, modtree can suggest to you which modules you should take next, in order to keep your future the most open.
Currently, this is our priority criteria:
- Whether the module is part of your degree requirements or not
- How many modules would you unlock, if you were to complete this module
By prioritizing with these two criteria, you are sure to make constant progress in your degree, and that you will clear important modules first, so that you don’t run out of modules to take.
In the future, we intend to implement a reminder feature, to remind students to clear certain pre-requisites of higher modules they intend to take, so that they don’t have to worry about not being able to complete certain modules before graduation.
Community templates
Students might want to refer to seniors’ study plans, to see what kind of specializations to go for, or to find out if certain module combinations make sense.
In modtree, students will be able to search across existing the degrees made by the community, and fork a copy of their own.
Community module links
Currently, the linking of modules in the graph is purely based on NUSMod’s database.
However, lots of mods that are clearly linked are not recorded as so on NUSMods. For instance, CS1101S is not listed as one of CS2030S’s pre-requisites, even though it really is.
We plan to let users contribute community pre-requisites to act as a bridge between official pre-requisites and what’s really happening on the ground.
Testing
To merge a PR, we require all of the following tests to pass.
Mocking
In our unit tests, some functions might require valid user data, as they perform an intermediate action, typically requiring a database. Since external dependencies are involved, we use mocking. This helps us to properly isolate and focus on the code being tested, and we don’t have to worry about the state of the database. This also helps us run tests faster.
We use TypeORM as our object-relational mapping tool, and it provides us with the types that it uses. Hence, we are able to mock TypeORM repositories ourselves.
Unit testing
Unit tests test the smallest unit of code that can be logically isolated within our application. Typically, this is a function. Being logically isolated, we can supply a variety of test cases, to ensure that the function works as expected.
As mentioned above, we make use of mocking, so that we can also logically isolate tests that might require a database.
We separate our unit tests into core and non-core. Core unit tests refer to tests that involve our entities. This includes Module, Degree, User and Graph. This is an example run of yarn test core, which typically runs in 10 seconds:
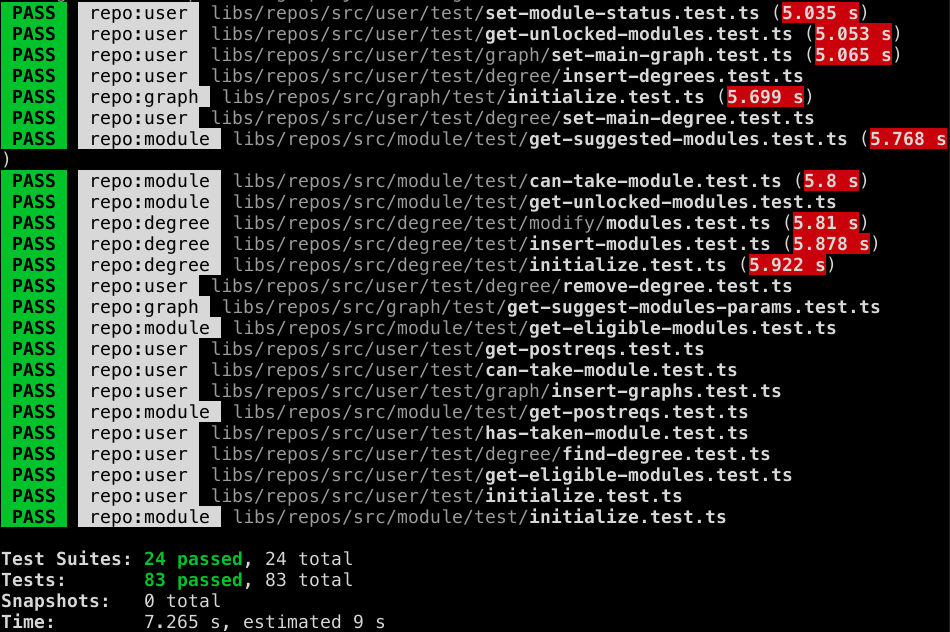
Since the tests run quickly, it speeds up our development. Additionally, with many unit tests, we are able to pinpoint the exact function that is implemented wrongly, and squash bugs more easily.
We also have other unit tests for utils.
Integration testing
Our integration tests are housed in libs/integration-tests. These integration tests involve a database, hence these tests are typically much slower than unit tests. Hence, this gives us extra confidence that our code works with a real database.
Additionally, we test functionality that involves different functions, and which might have side effects. For example, when deleting a degree, all associated graphs get deleted too, so we check for that in our integration tests.
End-to-end testing
Our end-to-end tests help to demonstrate that different parts of our application code indeed work together in a real-life environment. It ensures that any changes we make to our codebase does not affect our core business logic. Thus, we are more confident to make releases to our production environment.
We use Cypress for automated end-to-end testing. Since Cypress spawns a browser, we can simulate user actions such as clicking and typing.
Each end-to-end test is related to a user story. Here’s an example of a test where we add and remove nodes from a graph:
- Graph does not contain MA2104
- Add MA2104
- Cannot add MA2104 again
- Remove MA2104
- Can now add MA2104
This helps us to test more edge cases, especially in user actions.
Additionally, while unit/integration tests might test similar functionality, our users will mostly interact with our application via the frontend. End-to-end tests help us to test frontend-specific details, such as asserting that a user cannot add the same module to a graph twice.
API tests
We use tRPC in our backend to implement end-to-end typesafe APIs. This allowed us to more closely validate the input and output of each endpoint, and we were also able to make use of type safety in our frontend API calls. However, tRPC does not conform to the OpenAPI specification, so it will be difficult for users to use our application programatically.
Hence, we decided to also support routes that conform to the OpenAPI specification. We do this by using the trpc-openapi package, that allows us to map each tRPC endpoint to an OpenAPI endopint. Since our application uses the tRPC endpoints, and not the OpenAPI endpoints, we do not know whether the OpenAPI endpoints are functional. Hence, we wrote API tests for our OpenAPI routes.
The tests require a running server, as it tests valid API calls and expects a 200 response from each of them.
User testing
Strategy
For user testing, our strategy was to provide users with a specific, simple set of steps to execute to help them get started. Afterwards, they can explore the application. This was our set of steps:
- Sign up with your email
- Go to your profile and set modules you’ve done/doing
- Go to degrees tab and edit/create a new degree
- Go to graph tab and create a new graph
- Search for modules to add to the graph
We left out certain features in these steps, as we wanted to find out if the other features were intuitive enough, that they did not require explanation.
Results
We tested with a total of 8 users.
After completing the steps, we observed the following:
- Most users experimented with module relations (dependencies) in the graph. This is great, because our goal is to be a graph-oriented interactive visual tool.
- Some users were hoping for a suggest modules feature. We do have that feature in our plans.
Evaluator's testing
Login
Go to modtree.vercel.app. Click the sign in button. You can then choose between signing in with Google, Facebook, or Github.
You will be redirected to your chosen provider, and after you login, you will get redirected back to modtree.
After signing in, click on the user icon at the top-right. You should see your own email.
Core functionality
Search for any module, and click on a search result. You should see a modal pop up. This modal shows module information. You can add this module to your graph.
Added modules are color coded based on a few factors listed at the bottom right corner of the page.
Click on the user icon at the top-right, then click on “Your Profile”. This is where you can manage your graphs, degrees, and modules done/doing. You can experiment with this section in any way you want.